
Finished Project: Banaue Breeze Sweater – the third and final finished project of 2016


It’s my finished Banaue Breeze sweater!
Since I’m writing this two days before the new year, I’m fairly confident saying that this will be my final finished project of 2016 – which brings my total finished project count of 2016 to three! (and one project was mending a pair of pants). Huzzah!
It turns out that traveling and moving apartments seriously cut into my making time.
2016 has been an adventure. And 2017 is looking like it will be too.
Have a wonderful & safe New Years, I’ll see you next year.
– xo, Holly
Now on to the sweater details!
Materials
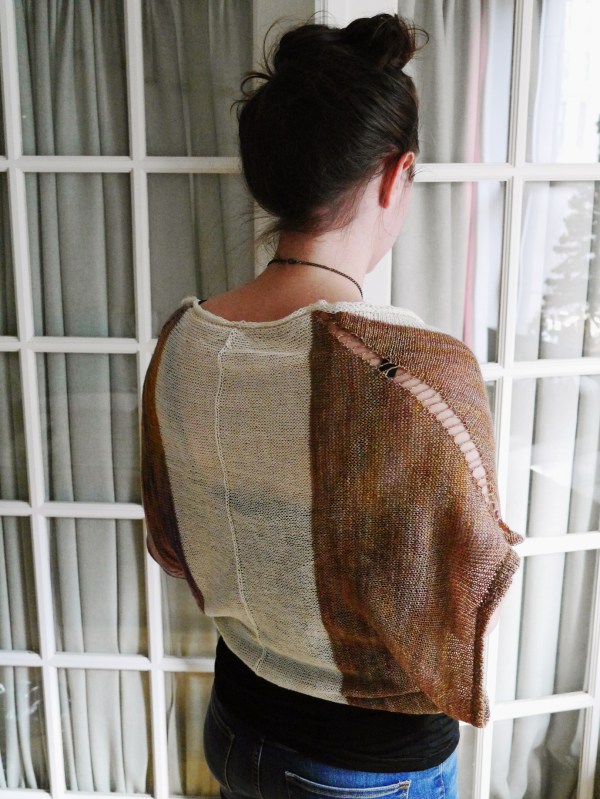
Pattern: Banaue Breeze by Stephen West
Yarn: 3 skein of Malabrigo laceweight
Malabrigo’s Silkpaca in colorways “Natural (063)” and “Piedras (862)”
1 skein each; 420 yds (384 m) per 50oz skein; 2 ply laceweight; 70% Baby Alpaca, 30% Silk
Malabrigo’s Lace in an unknown colorway (this is the variegated one – it came from my yarn stash with no tag), I poked around the Malabrigo website, but didn’t see a colorway in Lace that jumped out at me.
1 skein; 470 yds (430 m) per 50oz skein; single ply laceweight; 100% Baby Merino
The light brown almost solid is the skein of Silkpaca in Piedras – it doesn’t look a whole lot like Piedras. And while it does have some variegation in there I would have assumed it was a solid. So either it came from an incredibly subtle dye lot, or it was mislabeled.
Needles: US size 5s (3.75mm)
Blocked Gauge: 6sts and 9 rows per inch
Pattern Modifications
I made three modifications:
- the colorblocking
I worked sections 1 and 2 of the “Right Half” of the pattern in the Malabrigo Lace (the varigated unknown colorway), and sections 3 and 4 of the “Right Half” in the Silkpaca “natural” colorway. Then I worked sections 1 and 2 of the “Left Half” of the pattern in the Silkpaca “piedras(?)” colorway, and sections 3 and 4 of the “Left Half” in the Silkpaca “natural” again.
2. the exposed seam in the center of the front & back
As written, the pattern has you work a 3 needle bind off with the right sides together – making the seam end up on the wrong side. I just worked the 3 needle bind off with the wrong sides together – making the seam end of up on right side.
3. the i-cord bind off at the neckline
As written, the pattern has you pick up and knit a handful of rounds, then work a standard stretchy bind off. Instead, I picked up and knit a handful of rounds fewer than the pattern called for, and then worked an i-cord bind off. Like I do on most of my sweaters.
The Sweater Parts I Love
- the turned hems at both cuffs
- the exposed seam
- the pattern blocking
- the loose floaty fit
- the beautiful drape that makes the floaty fit work
- the wide open neckline
- the shape!
- the line of double yarn overs across the shoulder
The Other Parts
- the sleeves – they are huge! I like them, they’re part of what attracted me to the sweater in the first place, and yet, every time I look at the sweater my first though is “the sleeves are huge!”
- the drape of the hem – it’s different, but every time I look at it I wonder how it was intended to sit on hips.
- the back of the neckline – I love how open the neckline is, but don’t love how it bunches at the back of the neck.


PS. if you missed it yesterday and want to procrastinate for 15 minutes, I dug out all my current works in progress, plus all my unfinished projects, and filmed them all.
You can watch my face say “I don’t know what I was thinking…” more times than I care to count, here!
Be sure to like or comment if you enjoy.


Mended: black Uniqlo jeans mended with Sashiko stitching

If you sew, or knit, or otherwise craft, you know that requests for “favors” – mostly that start with “can you make…” or “can you fix…” – are not uncommon.
Every crafter responds differently, and my general rule of thumb is “no to makes. yes to mends.”
As gifts? I make things. As commissions and for work? I make things. As favors? Generally not.
The flip side of this being, if someone asks mend something, or fix something. I’ll almost always say yes. Usually they’re not time consuming or complicated fixes, so I’m happy to.
The one general exception to my “yea sure I’ll fix it for you” response being jeans.
Will I hem your jeans? Sure. Will I fix a hole in your jeans? No.
Why? Because mending jeans is not so simple.
As a general rule of them, denim is an incredibly durable fabric. Of course some denim is more durable than others, and some is just downright delicate. But taken as a whole category of fabric, denim = durable.
That means that when your jeans get a rip in them due to age (by which I mean, you didn’t sit on a nail in a brand new pair of jeans), you need to fix the whole, as well as, reinforce a significant amount of the surrounding fabric.
If you’re ever patched a pair of jeans (or a flannel shirt for that matter), and had the patch, or stitching quickly rip away again, it’s because the stitching was sewn to weakened, or compromised fabric.

The pair of jeans I wanted to mend, had a (relatively) small rip in the crotch. It was, maybe, two inches long, and would have taken 5 minutes to whip stitch closed.
However. If I had mended these pants that way, the fix would have also lasted about 5 minutes.
Because, that small rip is indicative of weakened fabric in the whole surrounding area. The original fabric is very soft & thin, there are creases where it’s (almost) threadbare, and along the seams the fibers are beginning to wear away.
To create a mend that lasts, I needed to reinforce the fabric in the entire crotch area. So I used a patch of black cotton twill, and Sashiko inspired stitching to reinforce all of the weakened fabric.
Sashiko, is a traditional Japanese quilting technique, that uses rows of running stitches. Traditionally, it was used to reinforce fabric, prolong the life of garments, and stitch together patches of fabric into new clothes. It can be entirely utilitarian, or decorative. But either way because the stitching itself is so simple it’s incredibly quick to execute, and because it’s an all over quilting technique it creates exceptionally durable (and warm) fabric.
(There’s a reason it’s quite “on trend” in mending.)

As with any mending, or fixing, or repair project, the trick is seamlessly blend the old and the new. In this case, blending the patch (which on the inside of the pants) and the worn fabric.
My first attempt went ok in the beginning, but as the project went on, I started getting some pretty epic rippling. Which translated to binding around the top of the leg. Which I was not about to live with.
So rather than leave it half assed, out came the scissors, and into the garbage that stitching went.
Take number two, went much more smoothly. (In multiple senses of the phrase.)

Rather than simply doing single rows of running stitch, I worked two perpendicular lines of running stitch to create crosses. I did this by first working lines of running stitch in one direction (being sure to off set my stitches), and then working a second set of lines of running stitch at a 90º angle to the first (being sure to cross the first set of stitches).
It’s not the prettiest, or the most even, stitching I’ve ever done. But my hope is that it’ll last for a good long while to come.

I’m not sure if a mending job can be considered “visible mending” if you can’t really see it while I’m wearing the pants, (and the stitching is black on black), but there has been something tremendously satisfying about combining my love of blackwork embroidery, with visible mending, with elongating the life of a pair of much loved pants.
Materials Used:
- 1 pair of much loved Uniqlo bootcut black jeans (which they stopped selling ages upon ages ago) (these are also the pair that I based my self-made jeans on)
- 1 large scrap of black cotton twill fabric to use as the patch
- 1 skein of black 6-strand embroidery floss (I split the thread and used 3 strands)
- 1 embroidery needle
- some pins to hold everything in place
Finished Project: SFO-PDX-NYC Travel Sweater
Just a heads up before we begin – I’ve broken this sweater’s story into two posts. This is the “proper finished object post” with all the technical bits & pieces (material, needles, pattern, intended alterations, etc.) And I’ll post the travel story portion in a day or two. Because trying to combine the two stories was giving me a headache and also an incredibly long read.

It’s been quite awhile since I’ve had a finished object to write about. It seems that the last piece I wrote about was my Second Archer Button Up Shirt.
Though the last thing I actually finished was my black and white crochet cardigan – that got swept up in a packing frenzy the moment I finished the seaming – so unfortunately no photos & no post until I get a chance to unpack it from my storage unit.
Now that I’m thinking about it, I guess I have finished a tank top, plus a million and a half swatches – both of which my brain seems to dismiss as not “real” finished objects – though they clearly are…
But the point being – I finished my well-traveled sweater!!!
This is the sweater I started knitting in San Francisco, and knit throughout the rest of my time on the west coast. I ended up finishing the body of the sweater a couple days after I landed back in NYC, and finished adding extra length to the body the other day.

Materials
Yarn: 2 cones of Ito’s Shio, a 100% wool laceweight yarn, in colorway Navy.
This yarn is absolutely lovely, it’s got an amazing drape and a wonderful structure – the yarn is actually two thinner strands run alongside each other with the vaguest suggestion of a twist added.
Each cone comes with about 525 yards. So with only 1,050 yards total, I knew there was a possibility I’d need a third cone. But Imagiknit only had two cones in stock, so I got them and figured I’d deal with the impending game of yarn chicken later.
Which turned out to be alright, because I only needed the original two cones. I needed every last yard on those cones – but I only needed two.
Needles: US 4 (3.5mm) Addi 40″ circulars
I didn’t take any needles with me when I flew west – since I didn’t know exactly what knitting project I would be starting.
If I had been at home, I probably would have knit this sweater on US 5 (3.75mm) needles (because of the whole potentially not having enough yarn thing), but I ended up using US 4s (3.5mm) partly because they would help fill out my set of Addie fixed circular needles when I got back home.
And they ended up being perfect for this project – I think the US 5s would have ended up being a touch big.
Final Gauge: 8 stitches/inch; 10 rows/inch

Pattern & Planned Alterations
I used my go to top down raglan sweater recipe, with a bit of short row shaping at the back of the neck.
Though I miscalculated the original cast on number (sad panda), made a neckline that was far too wide, and had to go back to fix it.
I seem to have a tendency of knitting sweaters out of quantities of yarn that might not quite actually be sweater quantities of yarn – which leads to a fair number of instances where I “knit far enough on one body part, then change to another body part, and then go back to finish the first.”
There were a handful of those instances with this sweater. First I knit the body, then I started one sleeve, and went back to the yoke. Then I finished the first sleeve, and finished the second sleeve, before undoing the bind off on the body, and added a couple inches of length to it.
And next (because I still have a smidge of yarn left) I want to undo the current decrease bind off at the neckline, and replace it with an I-cord bind off.

What Went Well
The fabric – I absolutely love sweater fabric that is created with lace weight yarn and a slightly larger than traditional needle. Usually for this sort of lace weight yarn I would have used a US 1 (2.5 mm) or US 2 (2.75 mm) needle, which would have also created an amazing fabric. But I would have definitely needed a third (and maybe fourth) cone of yarn. It’s the structure of this yarn – that two stranded very loose ply – that works so hard to create the drape.
What I’d Do Differently
First. I think if I were to re-knit this sweater, I would have distributed my sleeve decreases, and hip increases farther apart. As the sweater currently stands the sleeves are a little formfitting, and the hips flair out just a bit more than I usually like. I don’t think they’re worth going back and re-knitting, just minor annoyances.
Second. This isn’t really something I’d do differently, but it is information I want to tuck away for my next sweater project. I think I vastly prefer the fit of yoked sweaters to raglan sweaters. I think I just prefer the way they fit my frame.
Again, certainly not worth re-knitting for but definitely something to tuck away in the back of my mind (mostly so that the next time I plan a raglan sweater – someone can point me back to this post…)

Remember – the travel story is still to come.
If you want to make sure you never miss a post, you can always subscribe here.


